


DJI Terra builds a temperature-bearing 2D map from paired visible-light photographs and original radiometric thermal images. The visible images establish the geometry; the thermal images provide the temperature observations.
A usable project therefore needs more than R-JPEG files and a successful reconstruction message. It needs a complete image pair, a supported camera mode, credible alignment, documented material and environmental settings, and a reviewer who can trace each important finding back to the original evidence. Terra's map is a way to organize inspection observations; its colours do not establish a defect or certify the temperature.
This guide follows the dedicated Thermal Infrared workflow from field planning through processing, measurement, acceptance and handoff. Use its checks to define the deliverable before collection, investigate a failed project, or assess a thermal map supplied by another team. DJI's current download page lists Terra v5.3.5; the dedicated project arrived in v5.3.0. Recheck the installed version, licence and manual before a new mission.
1. Define the deliverable before the flight
Start with the decision the map must support. A site overview used to locate possible anomalies has different acceptance requirements from a numerical temperature comparison or an asset location that a field crew must find precisely. Agree on that distinction with the owner and reviewer before choosing the route, camera or report format.
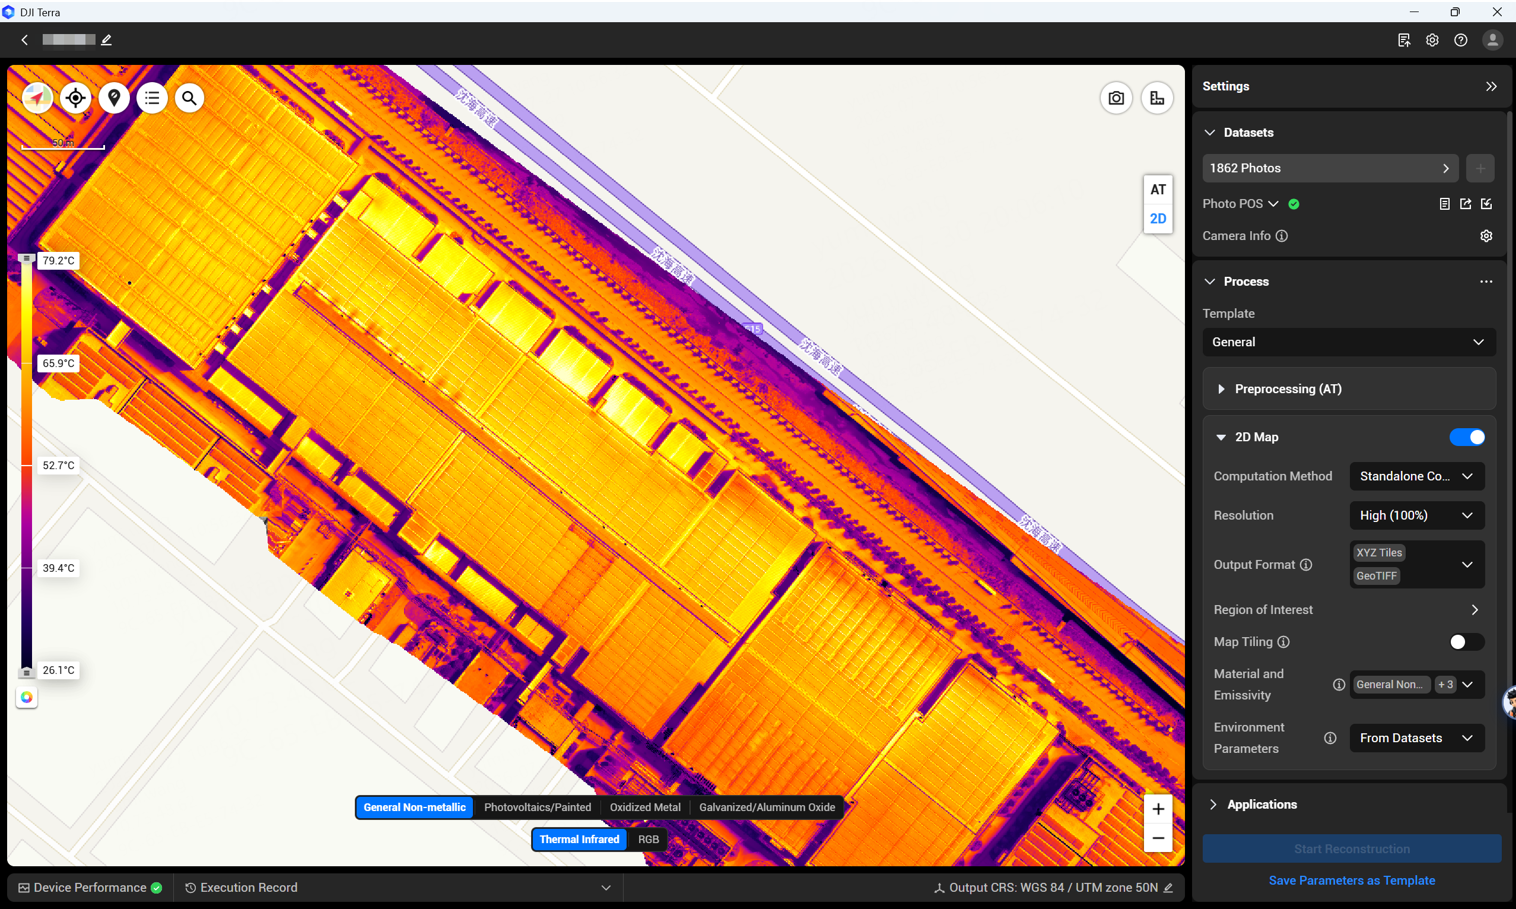
Terra's dedicated workflow combines visible-light aerial triangulation, thermal alignment, a temperature-bearing orthophoto and map annotations. It also generates a synchronized visible map for comparison. This is more useful than a folder of isolated images when the question concerns a large site, but it introduces a dependency: an error in the reconstructed geometry can place a plausible temperature observation on the wrong component.
Write a short project brief containing the site and asset identifiers, inspection question, smallest relevant target, required coverage, location tolerance, temperature-review method and person authorized to accept the result. Specify whether the output is a screening map, a repeat-inspection comparison or evidence for a separate specialist assessment. Do not leave “accurate thermal map” as the whole specification; neither the intended accuracy nor the verification method is clear.
For example, a solar owner might need suspected anomalies assigned to identifiable rows and modules so a technician can revisit them. A roof owner might need areas for follow-up investigation rather than a moisture diagnosis. These are planning examples, not customer case studies. In each case, the map should preserve the evidence needed for the next person to question the interpretation.
Original visible photos support matching. Original thermal R-JPEGs retain radiometric observations. Keep the association and metadata.
Check visible AT, thermal alignment and coverage. Document coordinates and the material/environment settings used.
Locate the original visible and thermal photos for an annotation. Check the target, viewing geometry and parameter scope.
Record the observation, uncertainty, review status and next action. Keep the map, originals and report together.
2. Check the camera, files and software support
Use the current dedicated Thermal Infrared support list, rather than assuming that any DJI thermal camera or any R-JPEG can enter this task. DJI's current English manual lists Mavic 3T/TA, Matrice 3TD, Matrice 4T/TD, Zenmuse H20N, H20T and H30T. It explicitly excludes Matrice 30T, the Zenmuse XT series and third-party devices. That restriction concerns this reconstruction task; it does not judge their usefulness for a different inspection workflow.
The import requires both visible JPG/JPEG photographs and thermal JPG files containing radiometric data. The manual identifies visible filenames commonly ending in _V or _W and thermal filenames generally ending in _T. These suffixes help with sorting, but are not proof of valid content or a matching pair. Preserve the original names and directory relationships instead of renaming every file to a generic “inspection image.”
Each group must contain at least ten images before reconstruction can start, and the counts should correspond. Ten is a software minimum, not enough to specify a site's coverage. Equal counts also cannot prove that the same ground was photographed at corresponding moments. Inspect capture positions, timestamps and the source images when a pair looks doubtful.
Keep untouched originals separate from working copies. A palette screenshot or an ordinary JPEG exported for a presentation is not a replacement for the radiometric original. Check for missing position/attitude information, absent strips, truncated files and changes made by an intermediary application. The related Matrice 4T R-JPEG evidence workflow covers capture and preservation in more detail.
Confirm the entitlement as well as the version. The feature's appearance in DJI documentation does not establish that a specific licence, account or workstation is ready. Confirm access to the Thermal Infrared project and process a representative paired dataset before committing the full inspection.
3. Plan the mission around the thermal target
DJI recommends a DJI Pilot 2 Orthophoto mission with both visible and thermal lenses selected. Plan ground sampling distance from the thermal camera, not the sharper-looking RGB image. The limiting question is whether the target occupies enough useful thermal pixels for the intended interpretation. A small component can be obvious in the visible photograph while occupying too little thermal area to support a meaningful reading.
Use a representative capture to check that geometry before surveying the whole site. Review visible sharpness, thermal target coverage and the ability to identify the same object in both images. Digital enlargement and super-resolution presentation do not supply missing native radiometric detail. The current manual requires High Gain or Low Gain acquisition; images taken in Super Clear mode are not supported for this reconstruction.
DJI capture guidance. On a phone, scroll the table horizontally to read every column.
| Planning item | DJI guidance | Check in the field |
|---|---|---|
| Paired collection | Orthophoto route; visible and thermal lenses together | Both original groups exist and correspond. |
| Ordinary scene | At least 60% forward / 50% side thermal overlap | Continuous coverage at the actual target height. |
| Weak or repetitive texture | 80% forward / 70% side thermal overlap | Matching features across uniform roofs or repeated solar rows. |
| Capture geometry | Altitude below 120 m; drone–target distance within 60 m | DJI reconstruction guidance, not flight permission or a universal measurement range. |
| Boundary coverage | Extend at least one flight strip beyond the survey boundary | Only where permitted and safe; otherwise record the coverage limitation. |
| Lighting and mode | Avoid low-light collection; use supported High/Low Gain | Visible AT needs usable photographs; thermal-only night detection is a different workflow. |
Extra overlap is particularly useful where solar rows or roof surfaces look nearly identical to the matching algorithm. It cannot cure a reflection, a target that is too small, or an asset operating in an unsuitable state for the inspection question. Likewise, flying along the exact boundary can leave the edge with weaker overlap than the centre. Plan a buffer deliberately and identify inaccessible portions rather than hiding them in the final crop.
For repeat inspections, record weather, surface condition, viewing geometry, operating state and the time of collection. As a practical project control, note whether snow, standing water, shadow or recent weather changes the exposed surface being compared. Canadian seasonal conditions can make two well-stitched maps poor temperature comparisons. The owner or qualified reviewer should define the collection window and acceptable conditions for the specific task.
The flight remains subject to its own approvals. DJI's altitude and distance guidance does not determine a Canadian operation category or authorize access to a roof, solar site or substation. Use Transport Canada's operation-category guidance for the intended aircraft, airspace and proximity to people, and obtain the relevant site permissions. A software-supported recurring workflow does not itself authorize remote operation.
4. Build and inspect the Terra project
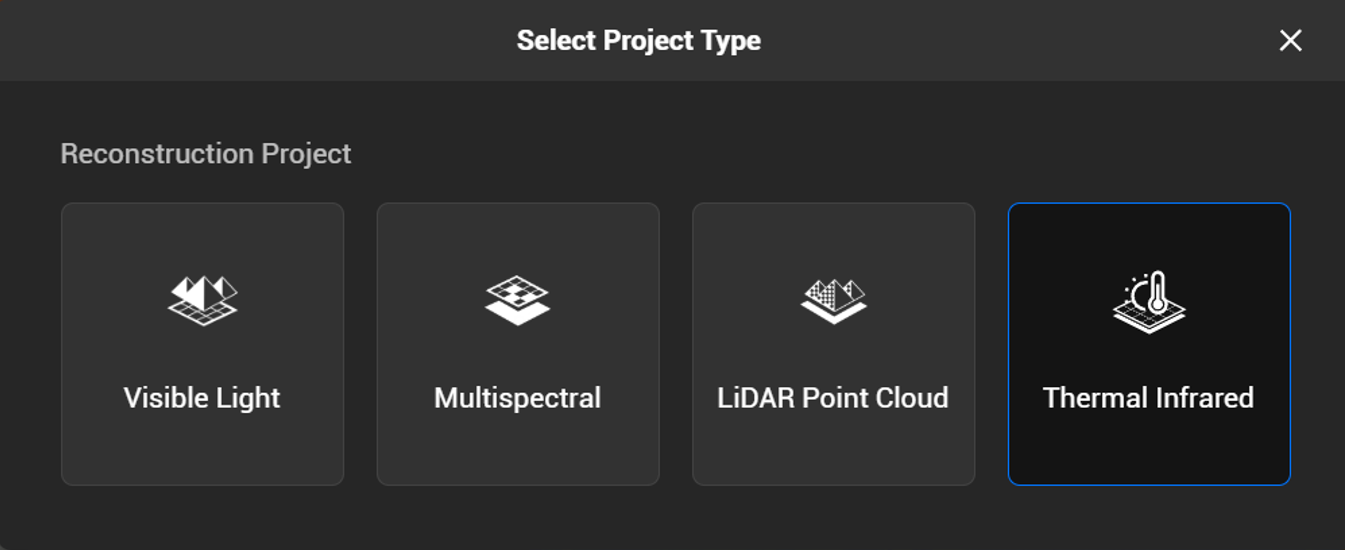
Create a Thermal Infrared project from the Reconstruction Project area, then import the folder containing the paired visible and thermal data. Use a clear project name and a stable storage path. DJI warns that special characters such as a number sign in the project path can cause reconstruction errors. Keep the working project separate from the protected original-data folder.
After parsing, address the import warnings before starting a large computation. Enable the photo-capture-point display and look for missing coverage, unexpected positions or an incomplete flight strip. Check image pairing and missing POS information. Terra supports POS import/export and local PPK, but these are processing inputs rather than independent proof of the delivered positional accuracy.
Confirm the output coordinate system against the owner's requirements. The import manual describes an arbitrary coordinate system as the default when images lack POS, and a known coordinate system when they contain POS. Check the actual selected system, units and any required datum information. For a map that must line up with existing assets, compare identifiable locations and agree on a verification method rather than relying on a plausible basemap overlay.
Terra performs AT using the visible images. Review that result before concentrating on thermal colours: weak light, blur, low texture or missing overlap in the visible set can undermine a map even when each thermal file opens correctly. Define the region of interest without cutting away areas the brief requires. Inspect the accepted coverage against the mission boundary, including its edges.
The current parameter manual makes a useful distinction about resolution. High, Medium and Low control the visible 2D map; the thermal model uses High by default and is not affected by that selector. Increasing a setting is therefore not a general remedy for insufficient thermal target detail. Standalone and cluster computation are available, but choose the resources needed for the dataset and installed entitlement, then retain the execution record and quality report.
This thermal task produces 2D outputs. It does not generate a thermal 3D mesh, point cloud or Gaussian splatting model. Specify a separate, verified process if the owner needs three-dimensional thermographic interpretation rather than implying that Terra's other reconstruction features are automatically part of this project.
5. Keep material and parameter scopes separate
Set emissivity according to the surface being evaluated and the review method. Terra's presets are convenient starting assumptions, not measurements of an individual panel, coating or piece of metal. A single default value cannot represent every surface in a mixed industrial scene. Different settings can produce different converted temperatures at the same location without a physical change in the asset.
Built-in presets in the current DJI manual. These values are software settings, not certified properties of your site's materials.
| Preset family | Emissivity | Review implication |
|---|---|---|
| General non-metal | 0.95; required default layer | Confirm that it is suitable for the surface being assessed. |
| Photovoltaics / painted | 0.85; optional | Do not treat glass, cells, paint and frames as one verified material. |
| Oxidized metal | 0.40; optional | Surface condition and reflected radiation need attention. |
| Galvanized / aluminum family | 0.15; optional | Low-emissivity surfaces can be strongly affected by reflected surroundings. |
The reconstruction applies each selected material across the full map and generates a separate temperature layer for it. Region-specific emissivity is not supported at this stage. You can add a custom material within the documented 0.10–1.00 range, but choosing a value still requires a defensible basis. Avoid presenting a newly created material name as evidence that its emissivity is correct.
Environmental parameters can come from the original datasets or be entered using Custom. Review ambient air temperature, reflected temperature and relative humidity, and record where they came from. Edited files can lose readable metadata. Manual entry may resolve a parameter gap in a supported dataset; it does not convert an unsupported camera into a compatible one or recreate missing radiometric observations.
One selected material → one full-map temperature layer. Document environmental inputs and reconstruction settings.
A point, line or area can use its own material/emissivity, overriding the global material for that measurement. These annotations support report export.
Photo-mode adjustments apply to the current original photo only. They do not update the generated map, and its photo annotations are not report exports.
This distinction is central to review. Map annotations can override the global material. Photo measurement has independent parameters, including distance and environmental settings. If a reviewer adjusts a source-photo reading, document that change and decide what must be reprocessed or reannotated before release. Do not leave the report containing an earlier map value while describing the adjusted photo value as if the two were interchangeable.
Low-emissivity metal deserves particular caution. DJI describes how a clear sky's reflected temperature can differ substantially from ambient air temperature, causing biased readings. If a layer contains missing temperatures, a different emissivity may help investigate the software result, but raising it until the gap disappears is not validation of the real surface temperature. Keep diagnostic trials distinct from accepted settings.
6. Measure on the map, then inspect the original
Use a point for a localized observation, a line for a temperature profile along a feature, or a polygon for a region. Terra reports a line's minimum, maximum and average temperatures and distances; an area adds projected area and temperature statistics. Choose geometry that matches the inspection question. A polygon crossing several materials can mix unlike observations and make its average less useful than separate, clearly named regions.
Set and record the temperature unit. Palettes and display ranges help make patterns visible, but they do not correct material assumptions, atmospheric effects or poor target coverage. When comparing screenshots, keep the units, palette, display range and selected material layer consistent. Otherwise the same physical observation can look different simply because the rendering changed.
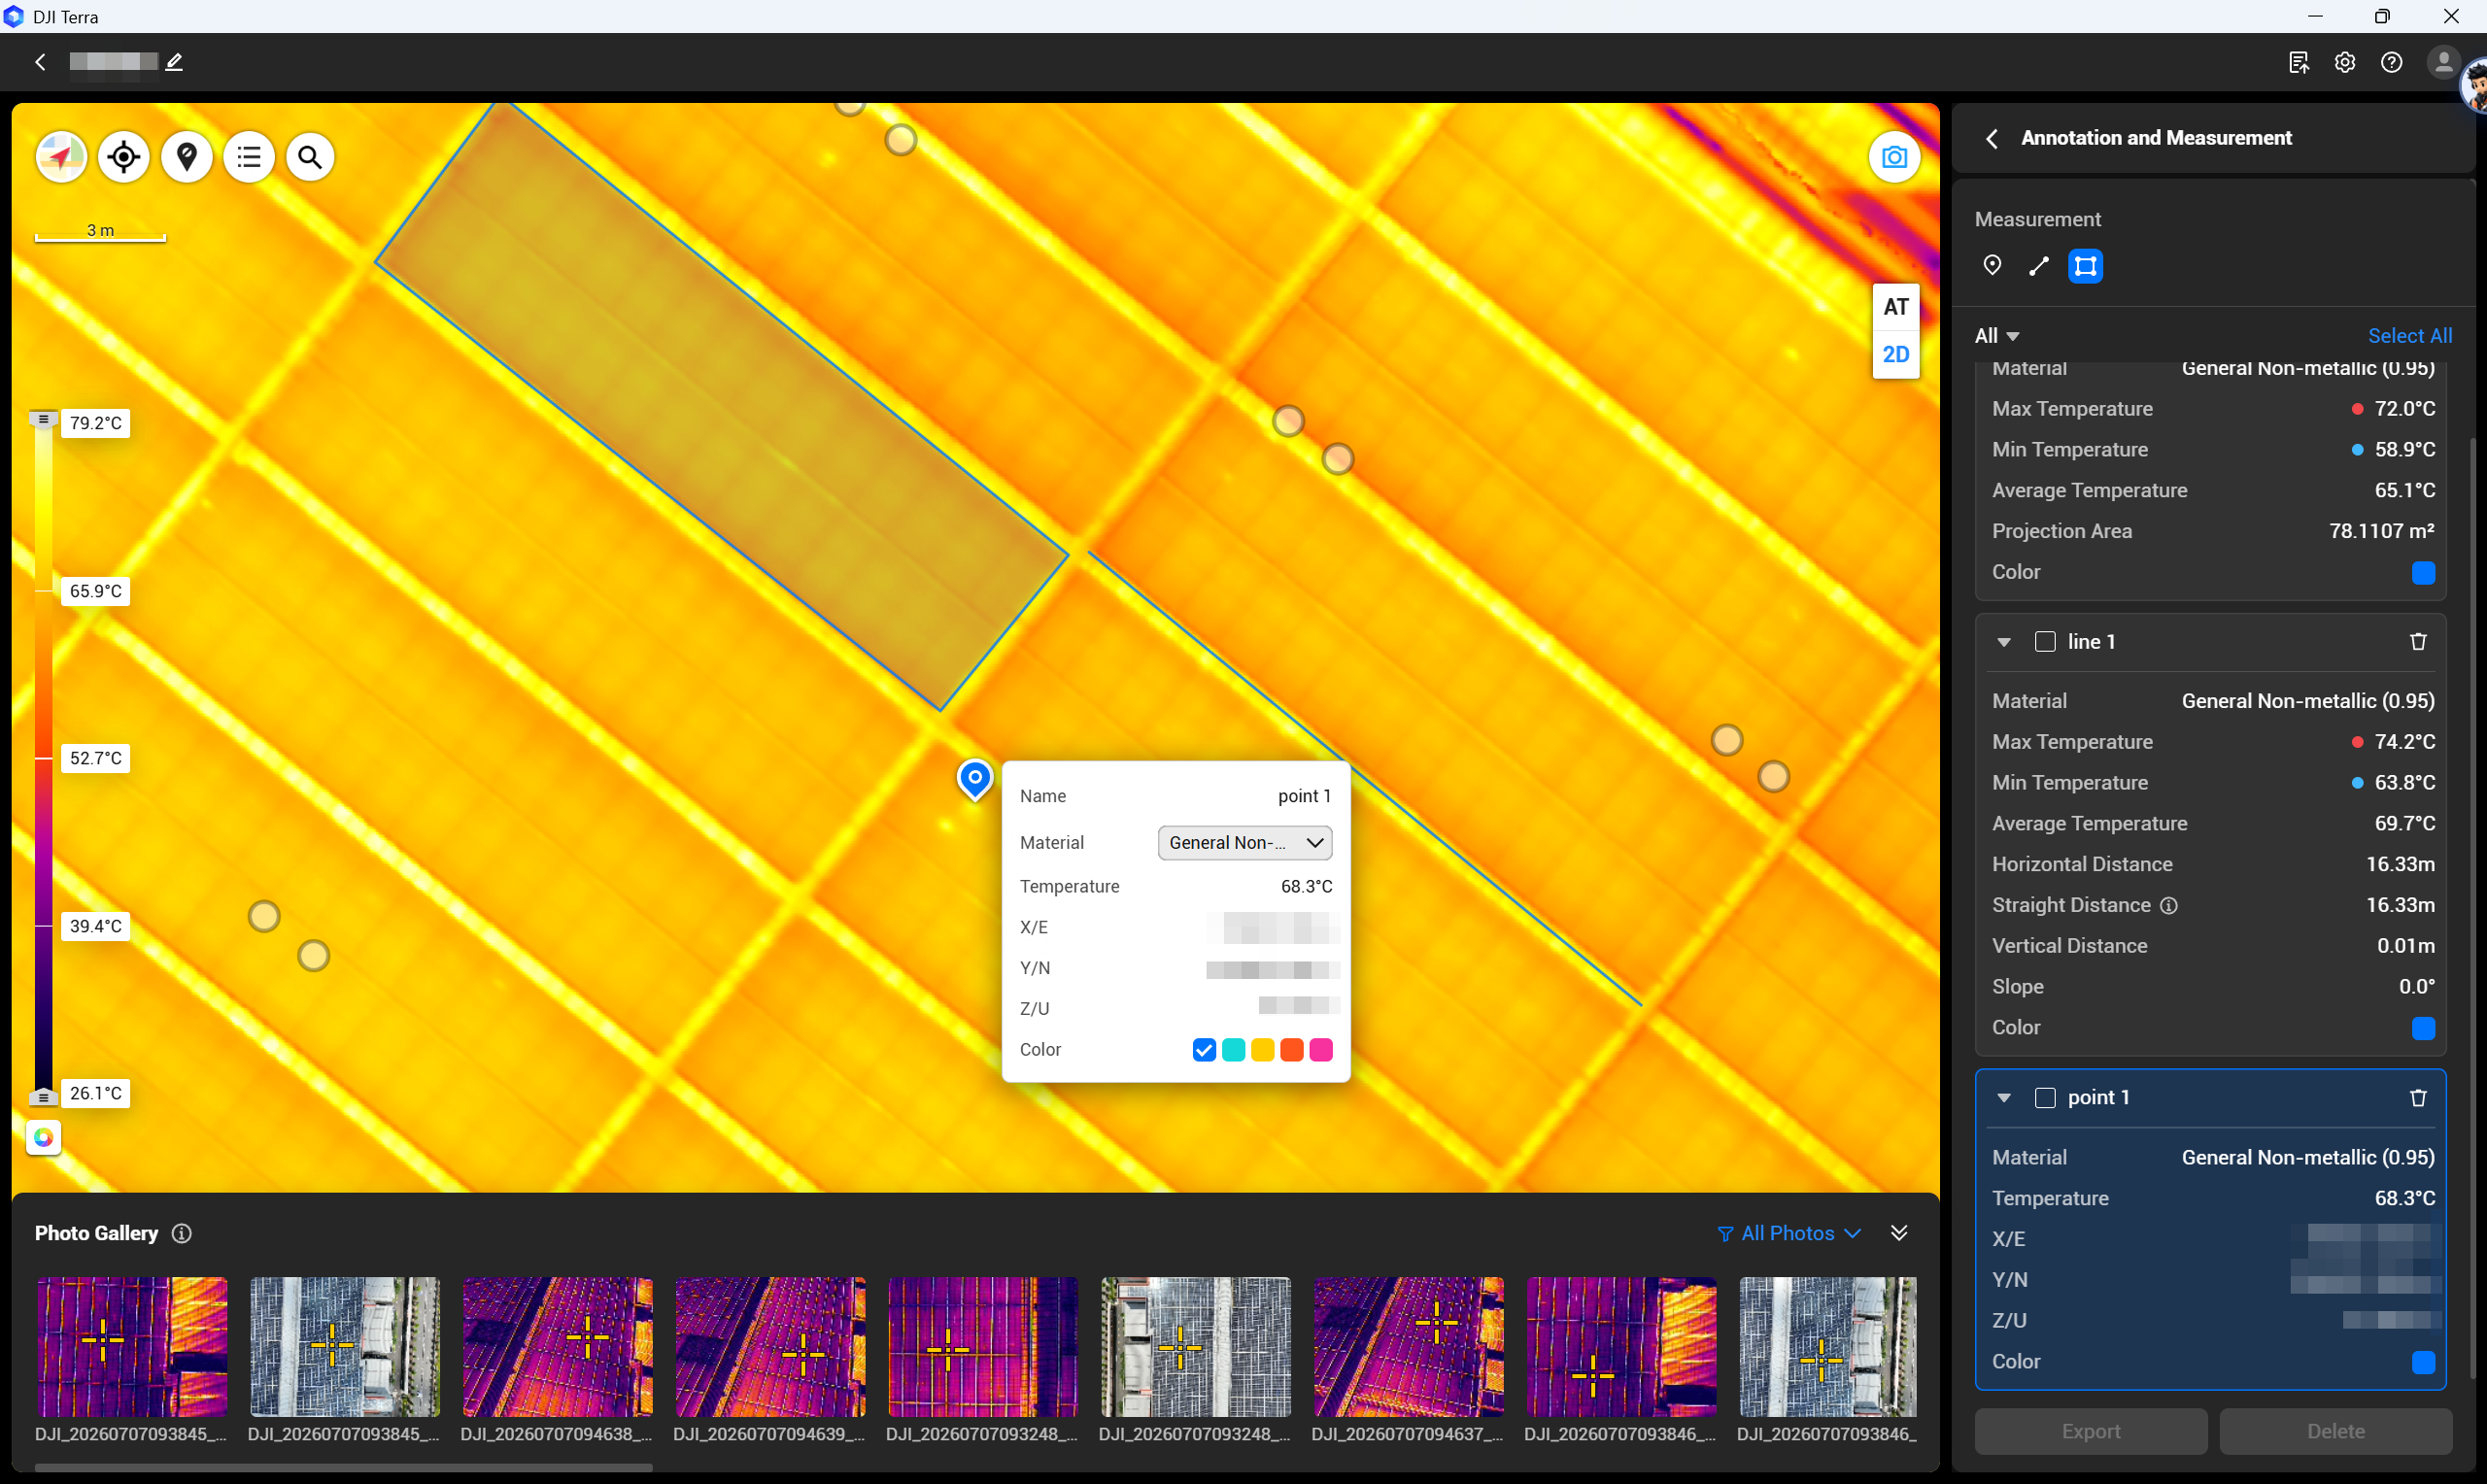
For an important observation, use Link to Original Photo to display the corresponding visible and thermal images. Enter photo measurement mode to inspect the target directly, review alternative source views and check that the marked feature is the intended asset. The gallery can help select a view closer to the image centre, but the reviewer must still assess target identity, angle, reflections and the actual surface seen.
Keep spatial and thermal confidence separate. An annotation can be associated with the correct row yet have uncertain thermometry; a credible source-photo pattern can also be poorly located in the map. State which question has been checked. Where the next action is consequential, the owner should arrange appropriate qualified interpretation or field verification.
DJI's thermal support FAQ reports an approximately 2°C maximum map-versus-photo difference under identical measurement parameters. This is a relative comparison, not a blanket ±2°C absolute field-accuracy guarantee. Sensor behaviour, target size, surface properties and conditions still matter. For a numerical review, compare the map and original using matched assumptions, record discrepancies and investigate them. Do not adopt that manufacturer figure as your project's acceptance threshold without a defined basis.
The thermal measurement accuracy guide explains these uncertainty sources beyond the mapping task. A map supports finding and locating an inspection question; neither a hot-looking pixel nor a report automatically diagnoses its cause.
7. Accept the evidence in four stages
Use a release checklist that distinguishes processing success from suitability for the agreed purpose. The following is an editorial project-control template to adapt with the owner and qualified reviewer; it is not a thermography standard. Set the required coverage, location checks and measurement-review criteria before processing, so an attractive result cannot redefine what counts as a pass.
Reusable acceptance register. Retain the evidence and reviewer for each row; scroll horizontally on phones.
| Release stage | Evidence to review | Hold the result when |
|---|---|---|
| 1. Original inputs | Paired files, supported mode, counts, source identifiers, POS and capture log | Files are unpaired, altered, missing or unsupported. |
| 2. Geometry / coverage | AT and quality report, visible/thermal alignment, boundary coverage, coordinate checks | The next crew cannot reliably identify the asset, or required areas are absent. |
| 3. Temperature context | Layer, units, materials, environment inputs and matched original-photo review | Unexplained discrepancies or unsuitable surface/capture conditions remain. |
| 4. Handoff / decision | Annotations, limitations, complete package, named reviewer and agreed next action | A map colour is being used as an unverified defect, safety or measurement conclusion. |
Inspect the centre and boundaries, not just the most impressive view. Look for seams, repeated structures displaced onto adjacent assets, abrupt temperature discontinuities, missing strips and areas where the visible and thermal footprints disagree. Review representative normal areas as well as the selected anomalies. A strong-looking anomaly can distract from a broader registration problem.
Assign an explicit status: accepted for the stated screening purpose, held for investigation, or requiring recollection. Include the excluded areas and reasons. If the map passes for localization but not quantitative comparison, say so in the cover note and report. This allows a useful partial result without overstating what has been established.
For a repeat campaign, compare capture conditions, geometry, material settings, software version and parameter sources before interpreting a temperature change. A changed setting is an alternative explanation that should be resolved or disclosed. Where a comparison is not defensible, retain both observations and arrange a controlled revisit instead of presenting the numerical difference as asset deterioration.
8. Troubleshoot the dependency that failed
Investigate the earliest failed stage rather than repeatedly changing the palette or export settings. Begin with files and support, then visible AT and coverage, then thermal parameters and measurement interpretation. Record the symptom, test, change and outcome; preserve the original dataset while you test a working copy.
Investigation prompts, not guaranteed diagnoses. Scroll horizontally to view the next action.
| Symptom | Check first | Next action |
|---|---|---|
| Cannot start | Both image types, minimum counts, supported device/mode, project path | Resolve the import warning; obtain missing originals or recollect. |
| Missing coverage | Capture points, filtered non-orthophoto photos, overlap, ROI, edges | Identify the gap; revise processing only if usable input exists. |
| Map shifted on assets | Visible AT, pairing, POS, output coordinates and independent location checks | Hold asset-level release until the geometry is verified. |
| Temperatures look implausible | Material layer, environmental inputs, units and original evidence | Compare with matched photo settings; document the discrepancy. |
| Local temperature gap | Coverage and emissivity assumption; review DJI's documented guidance | Test alternatives separately; do not change emissivity merely to obtain a favourable value. |
| Photo value changed; map did not | Independent photo-mode parameter scope | Decide what map processing or annotation needs revision before reporting. |
| Photo annotations absent from report | Photo mode versus map measurement mode | Use map report export; preserve the separate photo-review notes. |
Consult the installed version's execution record, known issues and current DJI manual when a failure does not match the input checks. Save the exact message, version, processing stage and reproducible steps. A later software version can change an issue or supported input; an old forum workaround is not proof that the present workflow needs it. If the capture lacks usable visible imagery or the required surface observation, a new mission may be the only credible remedy.
9. Deliver a map that someone else can review
Package the original evidence, the project configuration and the conclusions together. A PDF alone hides much of the capture and processing context. DJI's map report export supports PDF and XLSX: the PDF includes device information, measurement parameters and annotated views; XLSX contains measurement data. “Raw measurement data” in a spreadsheet does not mean it replaces the original radiometric photographs.
A practical handoff has five groups: protected visible/thermal originals and flight records; the Terra project with its version and settings; visible/thermal map outputs and coordinate information; annotations with PDF/XLSX and the quality report; and a release note identifying reviewer, purpose, gaps and next actions. Use a manifest to identify the actual delivered files and the version of the map referenced by the report.
When the owner needs a GIS layer, test the intended export in the receiving application. DJI documents tiled TIFF output for large maps, but a successful import or correct colour display alone does not prove that numeric temperature values, units and material context survived. Verify georeferencing, sample values and the software's interpretation of the output; deliver accompanying settings and documentation. Avoid promising a universally interchangeable temperature raster.
A minimum annotation record
For each consequential finding, record a unique ID, site/asset location, map version, annotation geometry, source-photo IDs, unit and selected material, environmental-parameter source, observed pattern, review status and next action. Keep an observation distinct from an inferred cause. If several alternative source views were checked, retain their identifiers rather than only the most convincing screenshot.
Illustrative entry: T-014 · solar row identifier supplied by owner · suspected localized temperature pattern · original visible/thermal pair attached · material assumption under review · held for technician verification. This example contains no measured temperature and does not assert a failed module.
For another inspection date, create a new dataset and change log rather than overwriting the accepted package. Record altered flight conditions, settings and software. An auditable comparison should let a future reviewer distinguish a physical change from a change in capture or conversion assumptions. The solar inspection resource and utility inspection guide cover the wider site workflow around that handoff.
10. Match the configuration to the deliverable
Choose the capture system after defining target coverage, site access and review requirements. The following are three current SpeedyDrone-listed options on DJI's supported thermal-input list. They address different deployment needs; the list is not a ranking or a promise that every firmware, route or licence combination is ready. Confirm paired acquisition and process a representative dataset from the actual configuration.

A portable visible/thermal capture platform. Its native thermal resolution is 640 × 512; plan target detail and a supported capture mode rather than relying on super-resolution output.
View Matrice 4T at SpeedyDrone →
A listed thermal aircraft for teams planning repeated deployment. Check the exact aircraft/controller configuration and paired-file handoff; software support does not confer remote-flight permission.
View Matrice 4TD at SpeedyDrone →
A supported multi-sensor thermal payload for a compatible aircraft. Confirm aircraft, mission and original-file workflow; the listing asks buyers to confirm availability before ordering.
View Zenmuse H30T at SpeedyDrone →For a team considering the Mavic platform, the current store route is the DJI Mavic 3 Thermal Advanced (M3TA) listing; DJI's manual includes 3TA in the supported thermal group. Verify the exact variant rather than treating the legacy URL text as its current model name. Older supported payloads may remain relevant to existing fleets without becoming the preferred new purchase.
Geometric surveying is a separate selection question. The DJI Matrice 4E is an RGB mapping platform, not a source of this task's thermal images. Neither its mapping role nor RTK on another aircraft automatically certifies the location or temperature accuracy of a thermal project.
SpeedyDrone lists DJI Terra Standard. Confirm the actual edition, account/device binding, update terms, workstation requirements and Thermal Infrared entitlement before purchase. The Terra licence guide supports that discussion. If the job only needs a few source-image observations, a complete site reconstruction may add little; choose the workflow that answers the evidence question.
DJI Terra Thermal 2D FAQ
Can I make the thermal map from R-JPEG files alone?
No. The dedicated task needs visible-light photographs for aerial triangulation and corresponding radiometric thermal files for temperature information and alignment. A thermal-only folder does not provide the complete dataset described in the current manual. Keep the original paired acquisition, metadata and filenames. If the visible set is missing or unusable, determine whether genuine corresponding originals exist; do not assume a palette screenshot or unrelated RGB flight can substitute for them.
How many images and what thermal mode are required?
The current manual requires at least ten visible images and ten thermal images before reconstruction can start. Their counts should correspond, but equality does not prove correct pairing or adequate site coverage. Use High Gain or Low Gain capture. Super Clear/Super Resolution thermal images are not supported for this task. Confirm these requirements against the current version, then design the mission around thermal target detail, overlap and the full inspection boundary.
Which DJI cameras are supported, and does M30T work?
The current English manual lists Mavic 3T/TA, Matrice 3TD, Matrice 4T/TD and Zenmuse H20N, H20T and H30T. It explicitly excludes M30T, the XT series and third-party devices from this dedicated reconstruction. Do not infer support from a camera's ability to capture thermal images or save radiometric files. Verify the exact camera, firmware, acquisition mode and Terra entitlement before relying on the workflow; a different source-image inspection may still be appropriate.
Can a night mission produce this thermal map?
DJI does not recommend low-light collection for the paired thermal reconstruction because visible photographs are needed for AT. Thermal detection in darkness and visible-image matching are different requirements. A source-image inspection after dark may be useful for a specific task, but that does not establish a suitable Terra mapping dataset. Choose the capture window with the inspection reviewer, balancing visible matching and the environmental or operating conditions needed for the thermal question.
What overlap and distance should I use?
DJI recommends at least 60% forward/50% side thermal overlap for ordinary scenes and 80%/70% for weak or repetitive texture. Its workflow announcement specifies altitude below 120 m and drone–target distance within 60 m. The manual also recommends a boundary buffer of at least one flight strip. These are reconstruction recommendations, not a universal measurement range, guaranteed quality or Canadian flight permission. Confirm target pixels, surface conditions, safe access and the actual legal operation independently.
Does changing a material or palette correct the temperature?
A palette changes presentation. Material/emissivity settings affect the conversion of radiometric observations to temperature, so they must match a defensible surface assumption. Reconstruction creates separate full-map material layers; map annotations can override the global material. Neither selecting a plausible preset nor obtaining an attractive colour pattern proves correctness. Record units, material, environmental inputs and source-photo review, and investigate reflections or unsuitable target coverage before treating a changed value as more reliable.
Why does a photo measurement differ from the map?
The map and photo modes can use different assumptions. Photo measurement has independent distance, emissivity and environmental parameters; its changes apply to the current photo and do not update the generated map. Compare the same target with matched settings and record any difference. DJI's approximately 2°C map-versus-photo figure is a relative comparison under identical parameters, not an absolute field guarantee. Geometry, source selection and uncertainty still need review; do not silently replace the report value with a separately adjusted photo value.
Can Terra export a thermal 3D model or point cloud?
The dedicated thermal task supports 2D output, including a temperature-bearing thermal orthophoto and synchronized visible map. It does not produce thermal 3D meshes, point clouds or Gaussian splatting. Terra has other reconstruction task types, but their existence does not establish a combined radiometric 3D deliverable. If an owner needs temperature on a three-dimensional asset, define the required output and validate an appropriate separate process before acquisition or procurement.
What can I export, and are photo annotations included?
Map measurement supports PDF reports and XLSX measurement data. The report records device information, measurement parameters and annotated views. Photo measurement is a separate verification mode: its photo annotations cannot be exported as a report through that workflow. Use map annotations for report export and retain separate source-photo review notes where needed. Deliver the originals, project settings, maps, quality report and limitations alongside the report; spreadsheet measurement data is not a replacement for radiometric originals.
Does a completed thermal map prove an asset is faulty?
No. Reconstruction and measurement tools organize observations; they do not establish a fault's cause or a safety conclusion. Review pairing, geometry, target identity, material, environment and operating state, then trace consequential annotations to the original visible/thermal evidence. Agree on screening acceptance and the next verification step with the owner or qualified reviewer. A software-generated report is not automatically certified thermography, survey validation or a metrology result.
Sources and scope
Technical documentation checked October 7, 2026. Current downloads show v5.3.5 dated August 20, 2026; v5.3.0 release notes date the dedicated thermal task to July 23, 2026. Interface illustrations come from DJI's July 31 announcement. Capture, support and export behaviour can change; check the current manual and installed entitlement.
- DJI thermal overview and data import: supported devices, modes, pairing, minimum counts and coordinate checks.
- DJI parameter configuration: visible/thermal resolution, material layers and environmental inputs.
- DJI measurement and output and photo measurement: statistics, source linkage, independent settings and reports.
- DJI July 2026 update: paired acquisition, thermal GSD, overlap, distance and low-light guidance.
- DJI thermal reconstruction FAQ (Chinese): relative temperature comparison and interpretation limits.
- DJI Terra downloads: current release, manual, known issues and workstation guidance. Transport Canada's current operation-category source is linked in the field-planning section.
The acceptance register and handoff record are planning tools designed for this guide. They do not replace an owner's inspection requirements or qualified professional judgement.


